hephaestusIR: temperature monitor via IR, the concept
12 Apr 2012Goal: Monitor server closet temperature.
What’s with the name? It’s the Greek god of technology & fire (among other things, seems Hephaestus was a pimp of trades). So yeah, technology (obviously) and fire (temperature, that’s about how deep the metaphor goes, and it sounds cool)
Solution: Instead of using a pricy ethernet shield (which is overkill), I had a MCE Remote receiver laying around, seeing I use MythTV (and wanted to put a unit upstairs, which I never did). Plus you can find these combos on Newegg, Amazon, or even Ebay for $10-$25. That’s still half a ethernet shield, which would’ve been overkill. Have the Arduino (or really, atmega328P-PU with an Arduino bootloader) + a temperature sensor (a TMP36 [Sparkfun]) + an IR LED emit signals in the same fashion as the MCE remote. And, create a method to transmit data this way. Essentially my solution thus far is to emit a couple start & stop codes, then an array of 16 other codes [for hexidecimal], and send a 2-byte packet and treat it kind of “UDP style” – if you get the whole packet great, if you don’t, throw it out and expect the next one in the stream. For a temperature sensor, this stream will be fine enough. Plus, it’s only going to be a few feet away from the IR receiver, so the error rate is very very low. That IR receiver is interfaced into a linux box which is running LIRC.
Milestones:
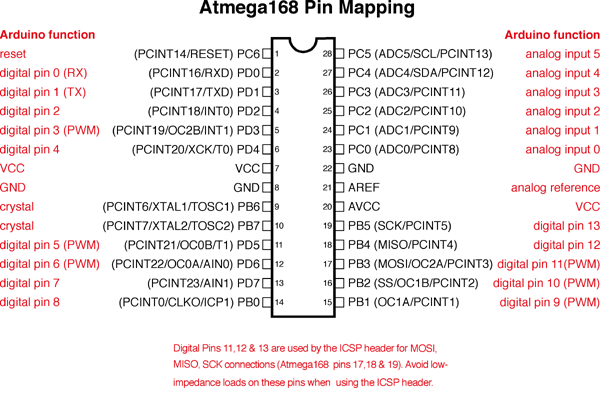
Get your atmega328 using the Arduino bootloader. First thing to accomplish is to use the Arduino as a development platform, and load bootloaders onto atmega328P-PU’s (so you can later transfer to perfboard). Now, there’s the official wiki page on how to load a bootloader to an atmega on a breadboard – but! It doesn’t work for the Uno. D’oh. That’s old. But, it’s actually easier if you use OptiLoader, which is a .PDE that does the whole thing for you. You just have to wire it up (using the wiki example) or this minimized example from “3 guys 1 lazer” (look at the Fritzing diagrams, not the shield). And if you want to power it (you do!), also make sure to check out the “stand alone arduino on a breadboard” from the wiki. Of course, you won’t have very much fun without the atmega pinout (128 and 328 have the same pinout);
Next up… The TMP36 sensor. It’s pretty simple to use. The most basic example ever is from ardx’s open code tutorials, and they have an example circuit, too. Ladyada goes over the TMP36 in quite a bit more detail, which is nice.
And the beast of the matter: Emitting IR Codes. This isn’t too difficult, but there’s some real show stoppers when you get down to the software. The hardware, is pretty trivial. The biggest mistake that I made was that I didn’t power the LED directly and control it with a transistor. You should do this, and if it doesn’t make sense right away, here’s a tutorial using a TIP120 for high power control from an Arduino. (I’ll have a schematic soon enough, too)
What really makes the software end a lot easier is using the Arduino IR Library by Ken Shirriff. But! I ran into a stopping block there, too. The thing you REALLY want is the 64bit version of the library. And since more than one guy’s code example is good to have for reference, ZenCoffee also has an example (but he reads the MCE remote, not emulate it. Still worth while and a raw example).
Firstly, I was reading the codes by using an IR receiver (not the USB one) wired into a breadboard. Which is all well and good, and rather satisfying to see work. But, soon enough it became easier to use the codes from LIRC, and convert them. Naturally: the Arduino IR library & LIRC use inverted 0/1 scheme from one another. So I wrote a PHP script to do the conversion for you.
Speaking of LIRC, there’s more information on it should you need it, the MythTV page does a good job breaking it down. And you can find a config already built for MCE remotes, also clutch.
Currently, I’ve breadboarded everything, and got all the discrete components unit tested, and skeletal code to handle all of them. I then integrated them on a breadboard and I’ve almost finished soldering it all out on perfboard. I mean to circuit check it and then give it any tuning shortly. I’ll also need to flesh out the code (which I’ll post after I do). I’ll also need to whip up a Perl script to sit there and listen to the IR and feed the information to cacti.
If I had my druthers, I’d also have outfitted this with a hardware watchdog timer, since it’s going to be running for long long long periods of time. The author of Practical Arduino brushes by it on his blog (however a good quick conceptual run-down). But my favorite solution looks to be this 555 watchdog timer from Open Hardware Hub. A real quick schematic can also be found from PlayWithArduino.